UnityからiOSアプリをビルドした時にエラー解消メモ【iOS,Unity】

エラーの内容

Could not launch “yousan”
Domain: IDEDebugSessionErrorDomain
Code: 3
Failure Reason: The operation couldn’t be completed. Unable to launch com.yousan because it has an invalid code signature, inadequate entitlements or its profile has not been explicitly trusted by the user.
User Info: {
    DVTRadarComponentKey = 855031;
    RawLLDBErrorMessage = "The operation couldn\U2019t be completed. Unable to launch com.yousan because it has an invalid code signature, inadequate entitlements or its profile has not been explicitly trusted by the user.";
}
--

解消方法

実機からのAppを信頼

iPhone実機で「設定」→「一般」→「プロファイルとデバイス管理」→当該アプリのプロファイルを選択し「Appを信頼」して、もう一度XCodeでBuild->Runすれば起動する。

www.meiseid.co.jp

iOS Developer PortalのIdentifiresで設定するApp ID及びBundle IDと一致させる

slackのchannelの履歴を取得する【GoogleAppsScript】

今回はchannelの投稿履歴をちょっと月ごとにまとめたいと思うことがあったので何番煎じになるかわかりませんがやってみます

slackのtokenを取得とscopeの設定

https://www.dkrk-blog.net/slack/slack_api01www.dkrk-blog.net

slackのapiconversations.historyを使用します

dev.to

チェンネルの履歴の取得

www.pre-practice.net

channel id の取得

  1. チェンネルを右クリック
  2. リンクを取得
  3. URLの最後の文字列

GASのレスポンス情報の確認

qiita.com

コード

ほかのいろいろしたいのでdoPostになっていますが気にせずに

function doPost(e) {
  const base_url = 'https://slack.com/api/conversations.history';
  const api = 'your token key';
  const channelId = 'channel id';
  
  let now = new Date();
  console.log(now.getMonth());
  let url = base_url+'?token='+api+'&channel='+ channelId;
  let respons = UrlFetchApp.fetch(url);
  let json = JSON.parse(respons);
  console.log(json);
  
  var response = { text: 'テストメッセージ' };
  return ContentService.createTextOutput(JSON.stringify(response)).setMimeType(ContentService.MimeType.JSON);
}

Maps for Unityを使ってみる【Unity】

CEDECgoogle が提供するUnityで使えるMaps for Unityというものがあることを知ったので触ってみました (いろんな方がやっているので,ちょっとやったよーとのメモです)

API keyの取得

bibinbaleo.hatenablog.com

実際の感じ

ここら辺を見てみます f:id:ayousanz:20200910005327p:plain

f:id:ayousanz:20200910005358g:plain

TextMeshProとDOTween Proをつかってゲームの起動時のタイトルをいい感じにする【Unity,TextMeshPro,DOTween】

デモ

使用アセット

TextMeshProの日本語化

hi-network.sakura.ne.jp

blog.naichilab.com

TextMeshProのoutlineについて

tsubakit1.hateblo.jp

kazupon.org

実装

タイトルのアニメーション

using System;
using Cysharp.Threading.Tasks;
using DG.Tweening;
using TMPro;
using UnityEngine;

public class TitleAnimation : MonoBehaviour
{
    [SerializeField] private TextMeshProUGUI title;
    // Start is called before the first frame update
    async void Start()
    {
        await UniTask.Delay(TimeSpan.FromSeconds(1f));
        title = GetComponent<TextMeshProUGUI>();
        DOTweenTMPAnimator tmproAnimator = new DOTweenTMPAnimator(title);
        for (int i = 0; i < tmproAnimator.textInfo.characterCount; ++i)
        {
            tmproAnimator.DOScaleChar(i, 0.7f, 0);
            Vector3 currCharOffset = tmproAnimator.GetCharOffset(i);
            DOTween.Sequence()
                .Append(tmproAnimator.DOOffsetChar(i, currCharOffset + new Vector3(0, 30, 0), 0.4f).SetEase(Ease.OutFlash, 2))
                .Join(tmproAnimator.DOFadeChar(i, 1, 0.4f))
                .Join(tmproAnimator.DOScaleChar(i, 1, 0.4f).SetEase(Ease.OutBack))
                .SetDelay(0.07f * i);
        }
    }
}

メニュー選択

using System;
using System.Collections.Generic;
using Cysharp.Threading.Tasks;
using TMPro;
using UniRx;
using UniRx.Triggers;
using UnityEngine;

public class SelectButton : MonoBehaviour
{
    
    [SerializeField] private List<TextMeshProUGUI> menuList;
    [Header("game mode")]
    [SerializeField] private Canvas settingsPanel;
    [SerializeField] private Canvas gameContinuePanel;
    private TextMeshProUGUI selectedMenu;

    private int menuIndex = 0;
    private bool isOpenSettings = false;
    private bool isOpenContinue = false;

    private const float OutlineWidth = 0.3f;
    // Start is called before the first frame update
    void Start()
    {
        selectedMenu = menuList[menuIndex];
        selectedMenu.outlineWidth = OutlineWidth;
        Debug.Log(selectedMenu.name);
        this.UpdateAsObservable().Subscribe(
                _ =>
                {
                    if (menuIndex < menuList.Count-1 && Input.GetKeyDown(KeyCode.DownArrow))
                    {
                        selectedMenu.outlineWidth = 0f;
                        menuIndex++;
                        selectedMenu = menuList[menuIndex];
                        selectedMenu.outlineWidth = OutlineWidth;
                        Debug.Log(selectedMenu.name);
                    }else if (0 < menuIndex && Input.GetKeyDown(KeyCode.UpArrow))
                    {
                        selectedMenu.outlineWidth = 0f;
                        menuIndex--;
                        selectedMenu = menuList[menuIndex];
                        selectedMenu.outlineWidth = OutlineWidth;
                        Debug.Log(selectedMenu.name);
                    }
                    if(Input.GetKeyDown(KeyCode.Z))OpenMenu();
                });
    }

    async void OpenMenu()
    {
        if (selectedMenu.name == "NewGame")
        {
            Debug.Log("new game");
        }else if (selectedMenu.name == "Continue")
        {
            isOpenContinue = true;
            gameContinuePanel.gameObject.SetActive(true);
            await UniTask.Delay(TimeSpan.FromSeconds(3f));
            gameContinuePanel.gameObject.SetActive(false);
        }else if (selectedMenu.name == "Settings")
        {
            isOpenSettings = true;
            settingsPanel.gameObject.SetActive(true);
            await UniTask.Delay(TimeSpan.FromSeconds(3f));
            settingsPanel.gameObject.SetActive(false);
        }else if (selectedMenu.name == "Exit")
        {
            #if UNITY_EDITOR
                  UnityEditor.EditorApplication.isPlaying = false;
            #elif UNITY_STANDALONE
                  UnityEngine.Application.Quit();
            #endif
        }
    }

    void SettingOption()
    {
        
    }
}

参考サイト

game-ui.net

EasySave3で自作のclassを使って保存する【Unity,EasySave3】

はじめに

ゲームのテンプレートを作成してる中でセーブ&ロードは必須だろうと思い実装をしていたのですが,基本EasySaveではint,sting,Vectorしか保存できないみたいなので自作のclassどうやってやるんだろうと思い,思ったよりも時間がかかったので記事にしておきます

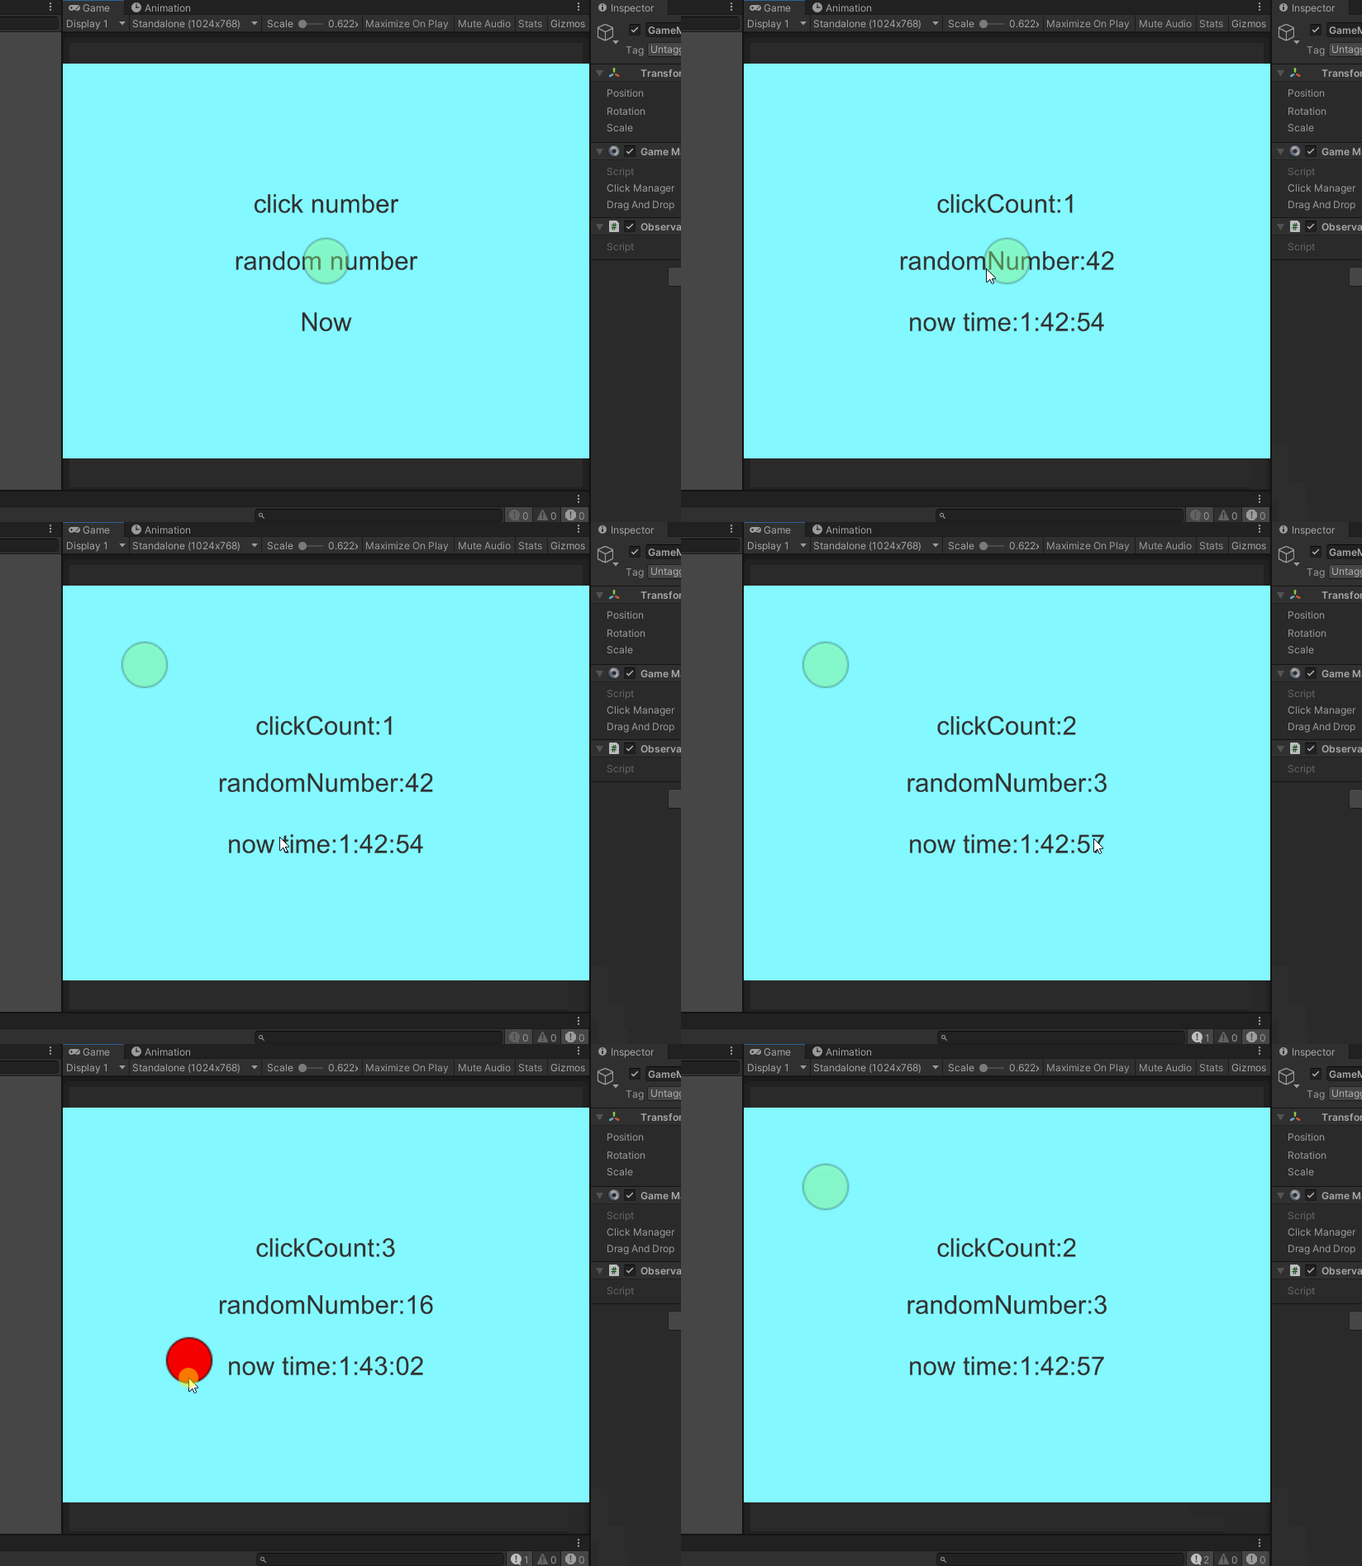
サンプルアプリ

実際に今回は以下のようなものを作って自作のclassの情報をセーブ&ロードしてみました

  • 現在時間を取得・表示
  • 画面のクリックの取得・表示
  • 画面をクリックしたときにランダムの数字を発行・表示
  • ドラッグアンドドロップできるUIを配置(この位置を保存)

こんな感じで動きます 途中で保存,最後のほうでロードしています
使用アセット

実装

難しいことではなく,単にclass -> jsonにしてからstringで保存すればよかったみたいです

ドラッグアンドドロップ

using System;
using UnityEngine;
using UnityEngine.EventSystems;
using UnityEngine.UI;

// Imageコンポーネントを必要とする
[RequireComponent ( typeof ( Image ) )]

// ドラッグとドロップに関するインターフェースを実装する
public class DragAndDrop : MonoBehaviour, IDragHandler, IBeginDragHandler, IEndDragHandler
{
    [SerializeField] private Image circle;
    private Color _beforeColor;
    private Vector3 _circlePosition;

    private void Start()
    {
        _circlePosition = transform.position;
    }

    public void OnBeginDrag ( PointerEventData eventData )
    {
        _beforeColor = circle.color;
        circle.color = Color.red;
    }

    public void OnDrag ( PointerEventData eventData )
    {
        // ドラッグ中は位置を更新する
        transform.position = eventData.position;
    }

    public void OnEndDrag ( PointerEventData eventData )
    {
        circle.color = _beforeColor;
        transform.position = eventData.position;
        _circlePosition = eventData.position;
    }

    public Vector3 GetCirclePosition()
    {
        return _circlePosition;
    }

    public void SetCirclePosition(Vector3 position)
    {
        gameObject.transform.position = position;
    }
}

セーブ&ロード

using UniRx;
using UniRx.Triggers;
using UnityEngine;

public class GameManager : MonoBehaviour
{
    [SerializeField] private ClickManager clickManager;

    [SerializeField] private DragAndDrop dragAndDrop;
    private SaveData _saveData;

    private void Start()
    {
        #region save data
        this.UpdateAsObservable().Where(_ => Input.GetKeyDown(KeyCode.S)).Subscribe(_ =>
        {
            _saveData = new SaveData();
            _saveData.Time = clickManager.GetTime();
            _saveData.RandomNumber = clickManager.GetRandomNumber();
            _saveData.ClickNumber = clickManager.GetClickCount();
            _saveData.CirclePosition = dragAndDrop.GetCirclePosition();
            SaveES3(_saveData);
        });
        #endregion

        #region load data

        this.UpdateAsObservable().Where(_ => Input.GetKeyDown(KeyCode.L)).Subscribe(_ =>
        {
            SaveData saveData = LoadES3("1");
            dragAndDrop.SetCirclePosition(saveData.CirclePosition);
            clickManager.SetText(saveData.Time,saveData.ClickNumber,saveData.RandomNumber);
        });

        #endregion
    }

    void SaveES3(SaveData saveData)
    {
        string json = JsonUtility.ToJson(saveData);
        Debug.Log(json);
        ES3.Save("1",json);
    }
    
    SaveData LoadES3(string key){
        if (ES3.KeyExists(key))
        {
            var json = ES3.Load<string>(key);
            Debug.Log(json);
            SaveData saveData = JsonUtility.FromJson<SaveData>(json);
            return saveData;
        }
        else
        {
            return null;
        }
    }
}

class SaveData
{
    public string Time;
    public string RandomNumber;
    public string ClickNumber;
    public Vector3 CirclePosition;
}

クリックしたときの処置

using System;
using UnityEngine;
using UnityEngine.EventSystems;
using UnityEngine.UI;
using Random = UnityEngine.Random;

public class ClickManager : MonoBehaviour,IPointerClickHandler
{
    [SerializeField] private Text timeText;
    [SerializeField] private Text clickCountText;
    [SerializeField] private Text randomNumberText;
    private int _clickCount = 0;
    

    public void OnPointerClick(PointerEventData eventData)
    {
        int temp = Random.Range(0, 100);
        randomNumberText.text = "randomNumber:"+temp;

        _clickCount++;
        clickCountText.text = "clickCount:"+_clickCount;
        timeText.text = "now time:" + DateTime.Now.ToLongTimeString();
    }

    public string GetTime()
    {
        return timeText.text;
    }

    public string GetClickCount()
    {
        return clickCountText.text;
    }

    public string GetRandomNumber()
    {
        return randomNumberText.text;
    }

    public void SetText(string time, string clickCount, string randomNumber)
    {
        timeText.text = time;
        clickCountText.text = clickCount;
        randomNumberText.text = randomNumber;
    }
}

参考サイト

kan-kikuchi.hatenablog.com

kazupon.org

unity-shoshinsha.biz

negi-lab.blog.jp

http://magcat.php.xdomain.jp/brog/?p=195magcat.php.xdomain.jp

PySide2とQtDesigerでGUIのアプリの作成Memo【PySide2,QtDesiger,Python】

メモついでに書いておきます(書き途中)

MacでのQtDesigerのpath

Anacondaを使用して入れた場合以下のpathにあります

/Users/user name/opt/anaconda3/envs/pyside2/bin/Designer.app

PySide2で音声を録音・文字起こしをする【PySide2,Python】

PySide2でリアルタイムで文字起こし,音声の録音をやってみたいと思います

実行結果

実行すると録音の音声ファイル recorded.wavとその録音音声内容のrecordedText.txtが保存されます f:id:ayousanz:20200904104754p:plain

音声の認識が良くないのか,自分の発音が良くないのか...

正確には録音できない時があります f:id:ayousanz:20200904104908p:plain

準備

今回必要なものをconda でinstallします

音声を扱うためのライブラリ

conda install -c anaconda pyaudio

録音をするためにライブラリ

conda install -c conda-forge speechrecognition

Code

import speech_recognition as sr


def main():
    r = sr.Recognizer()

    with sr.Microphone() as source:
        r.adjust_for_ambient_noise(source)

        print("Please say something")

        audio = r.listen(source)

        print("Recognizing Now .... ")

        # recognize speech using google

        try:
            print("You have said \n" + r.recognize_google(audio))
            print("Audio Recorded Successfully \n ")


        except Exception as e:
            print("Error :  " + str(e))

        # write audio and text

        with open("recorded.wav", "wb") as f:
            f.write(audio.get_wav_data())

        with open("recordedText.txt", "w") as f:
            s = str(r.recognize_google(audio))
            f.write(s)

if __name__ == "__main__":
    main()

参考サイト

codeloop.org