intfloat/e5-mistral-7b-instructを動かす

初めに

日本語の埋め込みモデルでスコアが高い intfloat/e5-mistral-7b-instructを触ってみます

参考(JapaneseEmbeddingEval)

github.com

環境

  • L4 GPU
  • ubuntu22.04

準備

ライブラリの追加をします

!pip install flash_attn -U
!pip install --upgrade transformers torch

実行

まずはサンプルコードでテキストをベクトル化します

import torch
import torch.nn.functional as F

from torch import Tensor
from transformers import AutoTokenizer, AutoModel


def last_token_pool(last_hidden_states: Tensor,
                 attention_mask: Tensor) -> Tensor:
    left_padding = (attention_mask[:, -1].sum() == attention_mask.shape[0])
    if left_padding:
        return last_hidden_states[:, -1]
    else:
        sequence_lengths = attention_mask.sum(dim=1) - 1
        batch_size = last_hidden_states.shape[0]
        return last_hidden_states[torch.arange(batch_size, device=last_hidden_states.device), sequence_lengths]


def get_detailed_instruct(task_description: str, query: str) -> str:
    return f'Instruct: {task_description}\nQuery: {query}'


# Each query must come with a one-sentence instruction that describes the task
task = 'Given a web search query, retrieve relevant passages that answer the query'
queries = [
    get_detailed_instruct(task, 'how much protein should a female eat'),
    get_detailed_instruct(task, 'summit define')
]
# No need to add instruction for retrieval documents
documents = [
    "As a general guideline, the CDC's average requirement of protein for women ages 19 to 70 is 46 grams per day. But, as you can see from this chart, you'll need to increase that if you're expecting or training for a marathon. Check out the chart below to see how much protein you should be eating each day.",
    "Definition of summit for English Language Learners. : 1  the highest point of a mountain : the top of a mountain. : 2  the highest level. : 3  a meeting or series of meetings between the leaders of two or more governments."
]
input_texts = queries + documents

tokenizer = AutoTokenizer.from_pretrained('intfloat/e5-mistral-7b-instruct')
model = AutoModel.from_pretrained('intfloat/e5-mistral-7b-instruct')

max_length = 4096
# Tokenize the input texts
batch_dict = tokenizer(input_texts, max_length=max_length - 1, return_attention_mask=False, padding=False, truncation=True)
# append eos_token_id to every input_ids
batch_dict['input_ids'] = [input_ids + [tokenizer.eos_token_id] for input_ids in batch_dict['input_ids']]
batch_dict = tokenizer.pad(batch_dict, padding=True, return_attention_mask=True, return_tensors='pt')

outputs = model(**batch_dict)
embeddings = last_token_pool(outputs.last_hidden_state, batch_dict['attention_mask'])

# normalize embeddings
embeddings = F.normalize(embeddings, p=2, dim=1)
scores = (embeddings[:2] @ embeddings[2:].T) * 100
print(scores.tolist())

ログで以下が出ます

[[82.91365814208984, 47.9715690612793], [46.95111083984375, 81.74346923828125]]

embeddingsの中を確認したいので、以下を実行します

print(embeddings)

結果は以下です

tensor([[ 0.0178,  0.0037, -0.0075,  ...,  0.0298, -0.0193,  0.0064],
        [-0.0033,  0.0003,  0.0154,  ...,  0.0310, -0.0047,  0.0013],
        [ 0.0172,  0.0028, -0.0087,  ...,  0.0116, -0.0094,  0.0094],
        [-0.0043, -0.0112, -0.0049,  ...,  0.0124,  0.0003,  0.0134]],
       grad_fn=<DivBackward0>)
cl-nagoya/shioriha-large-ptを動かす

初めに

公開されたので触っていきます

環境

  • L4 GPU
  • ubuntu22.04

準備

ライブラリを入れていきます

!pip install -U sentence-transformers
!pip install fugashi
!pip install unidic_lite

実行

サンプルのコードを実行します

from sentence_transformers import SentenceTransformer
sentences = ["This is an example sentence", "Each sentence is converted"]

model = SentenceTransformer('cl-nagoya/shioriha-large-pt')
embeddings = model.encode(sentences)
print(embeddings)

結果は以下のようになります

[[ 0.239826    0.48606512 -0.4585114  ...  0.12551573  0.37342685
   0.6000814 ]
 [-0.33355263  0.3741393  -0.8048501  ...  0.20616896  0.27591145
  -0.36157683]]

TripoSRを動かす

初めに

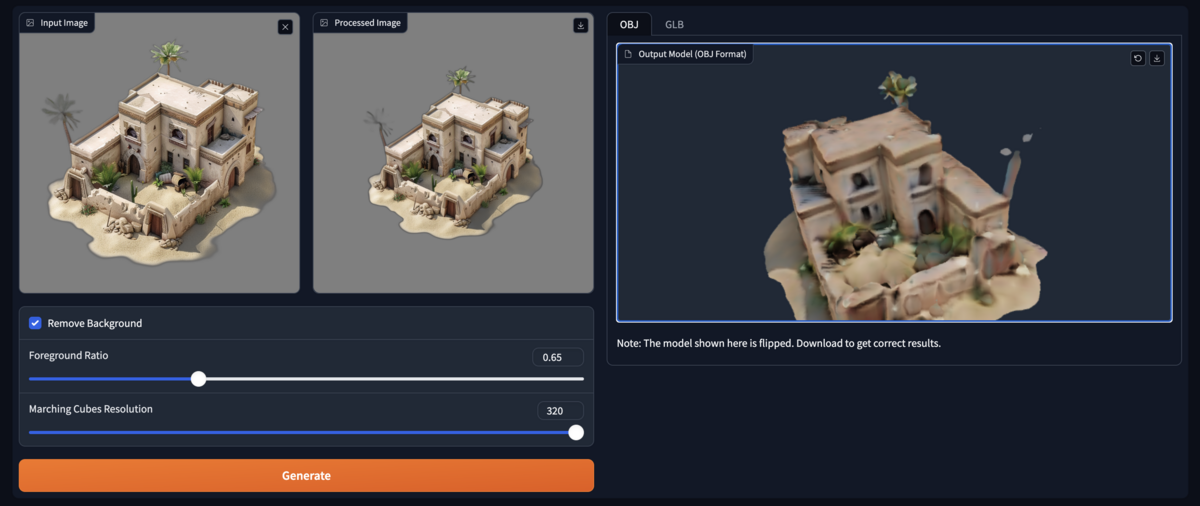
text to 3DがStabilityAIから出たので触ってみます

環境

  • L4 GPU
  • ubuntu22.04

準備

ライブラリをcloneして移動します

git clone https://github.com/VAST-AI-Research/TripoSR.git
cd TripoSR/

仮装環境を作ります

python -m venv venv
source venv/bin/activate

必要なライブラリを入れます

pip install wheel setuptools pip --upgrade
pip install -r requirements.txt

実行

以下で public URLを発行できる状態で実行をします

python gradio_app.py --share

実際に生成した結果は以下のようになりました

精度を上げたい場合は、Foreground Ratio を下げると良くなることがあるみたいです

MeloTTSを動かす

初めに

新しいTTSのライブラリが出ていたので触っていきます。

以下概要です

MeloTTS is a high-quality multi-lingual text-to-speech library by MyShell.ai. Supported languages include:
The Chinese speaker supports mixed Chinese and English.
Fast enough for CPU real-time inference.

またライセンスが MTI licenseになっています

github.com

環境

  • L4 GPU
  • ubuntu22.04

準備

まずは推論をする為の環境を作っていきます。今回はanacondaを使ってpythonのverを公式と合わせます(3.11だと他のライブラリのverの違いで動きませんでした)

conda create -n melo-tts python=3.9
conda activate melo-tts
pip install -e .

必要なモデルをダウンロードします

python -m unidic download

実行

推論するためのWebUIをpublic url付きで実行します

melo-ui --share

実行後は上記のようなUIが起動します

またサンプルテキストで日本語で音声を作成した場合は、以下のような音声になりました

youtu.be

レーニングコードはまだ公開されていないみたいなので、今後の期待です

フォルダ内の全てファイルの先頭に特定の文字を挿入するコマンド

開発環境

内容

特定のフォルダ内のファイルに text という単語を入れたい場合は、以下のように実行します

cd /path/to/target_folder && for file in *; do mv "$file" "text$file"; done

これによって temp.text というファイルの場合は、texttmp.text という名前に置き換わります

ITAコーパスをファイル名と本文のみに変換するスクリプトを作成する

初めに

TTSの学習データを作る際に 音声コーパスにはよく ITAコーパスが用いられることがあります。このコーパスは以下のフォーマットで作成されています.

ファイル名:本文,ヨミ

こちらを学習に使う際にヨミの部分は、必要がないので「ファイル名:本文」のみに変更するスクリプトを作成します。

環境

変換コード

以下のコードで変換することができます

import sys

def process_file(input_file_path, output_file_path):
    with open(input_file_path, 'r', encoding='utf-8') as input_file, \
         open(output_file_path, 'w', encoding='utf-8') as output_file:
        for line in input_file:
            # 「:」で1列目と2列目を分割
            parts = line.strip().split(':')
            if len(parts) >= 2:
                # 2列目をさらに「,」で分割して、最初の要素を取得
                first_part, rest = parts[0], parts[1].split(',')[0]
                # 1列目と2列目の最初の要素を出力ファイルに書き込む
                output_file.write(f'{first_part}:{rest}\n')

if __name__ == '__main__':
    if len(sys.argv) < 3:
        print("Usage: python script.py <input_file_path> <output_file_path>")
        sys.exit(1)
    
    input_file_name = sys.argv[1]
    output_file_name = sys.argv[2]

    process_file(input_file_name, output_file_name)

実行

以下のように引数に 入力ファイル名 + 出力ファイル名 を入れて実行します。

python convert_ita_corpus.py emotion_transcript_utf8.txt output_ita_convert_corpus.txt

結果は以下のようになります

入力ファイル

EMOTION100_001:えっ嘘でしょ。,エッウソデショ。
EMOTION100_002:シュヴァイツァーは見習うべき人間です。,シュヴァイツァーワミナラウベキニンゲンデス。
EMOTION100_003:デーヴィスさんはとても疲れているように見える。,デーヴィスサンワトテモツカレテイルヨーニミエル。
EMOTION100_004:スティーヴはジェーンから手紙をもらった。,スティーヴワジェーンカラテガミヲモラッタ。

出力ファイル

EMOTION100_001:えっ嘘でしょ。
EMOTION100_002:シュヴァイツァーは見習うべき人間です。
EMOTION100_003:デーヴィスさんはとても疲れているように見える。
EMOTION100_004:スティーヴはジェーンから手紙をもらった。

フォルダ内にある音声ファイルの合計を計算する

初めに

音声処理をする際にフォルダ内に音声ファイルがあるかを確認したいと思う時があります。その際に使用できる簡単なスクリプトを作ります

環境

  • L4 GPU
  • ubuntu22.04

準備

必要なライブラリを入れます

sudo apt update
sudo apt install ffmpeg
pip install pydub

実行

以下で特定のフォルダ内の音声ファイルの合計を計算できるスクリプトを作成します。

import os
import sys
from pydub import AudioSegment

def calculate_total_duration(directory):
    total_duration = 0
    supported_formats = ['wav', 'mp3']  # サポートされるフォーマットをリストに追加

    for root, dirs, files in os.walk(directory):
        for file in files:
            if any(file.endswith(f".{fmt}") for fmt in supported_formats):
                audio_path = os.path.join(root, file)
                try:
                    audio = AudioSegment.from_file(audio_path)
                    total_duration += len(audio)
                except Exception as e:
                    print(f"ファイル '{file}' を読み込み中にエラーが発生しました: {e}")

    return total_duration / 1000  # ミリ秒を秒に変換

def format_duration(seconds):
    hours = seconds // 3600
    minutes = (seconds % 3600) // 60
    seconds = seconds % 60
    return f"{int(hours)}h {int(minutes)}m {int(seconds)}s"

if __name__ == "__main__":
    if len(sys.argv) < 2:
        print("使用方法: python script.py <音声ファイルが格納されているフォルダのパス>")
        sys.exit(1)

    directory_path = sys.argv[1]  # コマンドラインからの引数を取得

    total_duration_seconds = calculate_total_duration(directory_path)
    formatted_duration = format_duration(total_duration_seconds)

    print(f"Total duration: {formatted_duration}")

上記は以下のように使用します

python sum_audio_time.py Data/

結果は以下のように出力されます

Total duration: 7h 53m 4s