RollBollGameをDoozyUIを使って書き換える【Unity,DoozyUI】

最近DoozyUIを買ったので,学習ついでにRollBollにDoozyUIを使ってみたいと思います. 中で使っているゲームはUnityのサンプルでも有名なRollBallをちょっとデモ用にいろいろ変更したものを使っています

Doozy UIとは

アセットストアより引用

DoozyUI は、Unity Editor のネイティブ拡張であり、コーディングを知らなくても、プロフェッショナルなユーザーインターフェースを簡単に管理およびアニメーション化できます。初心者にやさしく、スケーラブルな DoozyUI は、アマチュア開発者からプロのソフトウェアおよびゲームスタジオまで、あらゆる対象に最適です。

だそうです.

実際Canvasの切り替えや音の管理などは表示に楽になります(シーンのロードなどはまだ理解してません)

assetstore.unity.com

Demo

今回作成したものはAndroind向けに作っています. f:id:ayousanz:20201116173535g:plain

公式サンプルからの変更点と追加点

  • タイトル画面と終了画面の追加とアニメションの設定
  • ボールの操作をJoyStickに変更

タイトル画面と終了画面の追加とアニメションの設定

画像や文字の装飾はUI - Builderを使用して,画面の作成を行いました.

タイトル部分の変更

タイトル画面の「PLAY」のアニメーションはDOTweenを使用して以下のようにしています

TweenはそのままにしているとGCが残るため,タイトルからゲーム開始に移行するときに_tweener.Kill() を呼び出してKillをしています.

f:id:ayousanz:20201117132729g:plain

public class StartViewManager : MonoBehaviour
{
    [SerializeField] private Text time = default;

    [SerializeField] private GameObject playLogo = default;

    private Tweener _tweener;
    // Start is called before the first frame update
    void Start()
    {
        this.UpdateAsObservable().Subscribe(_ =>
        {
            time.text = DateTime.Now.ToLongTimeString();
        }).AddTo(this);
        _tweener = playLogo.transform.DOScale(new Vector3(1.3f, 1.3f), 1f).SetEase(Ease.Linear).SetLoops(-1,LoopType.Yoyo);
    }

    public void OnKillDOTween()
    {
        _tweener.Kill();
    }
}

終了画面の変更

タイトルと同様にしています.

f:id:ayousanz:20201117133315g:plain

終了画面は繰り返し使うため,_tweener.Kill() を呼んでいません

(Killを呼びと2回目にアニメーションが実行されなかったため..何か方法はあると思いますが調べられていません)

void Start()
    {
        _tweener = restartLogo.transform.DOScale(new Vector3(1.3f, 1.3f), 1f).SetEase(Ease.Linear).SetLoops(-1,LoopType.Yoyo);
    }

ボールの操作をJoyStickに変更

assetstore.unity.com

こちらのアセットを使用してJoyStick化にしました やり方は以下のサイトを参考にしています

qiita.com

Doozyを使って書き換えていく

DoozyUIを使って変更した点は以下になります.

  • CanvasをDoozyUIに変更
  • Canvasの表示・非表示をグラフを使って管理

準備等

  1. DOTweenのimport

    DoozyUIを使う前にDOTweenまたは DOTween Proのどちらかが必要になります.

  2. Text Mesh Proのimport

    TextMeshProをPackageManagerからImportします

  3. DoozyUIのimport

    DoozyUIをimportします.

Canvasの変更とグラフの作成

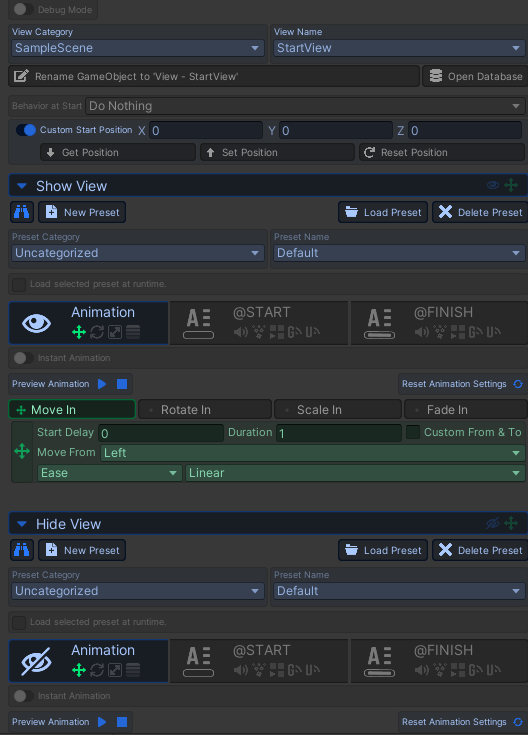
StartView・GameView・EndViewがあるので,それに対応するViewをDoozyUI側で作成します

使うViewの作成

f:id:ayousanz:20201117134055p:plain

Viewの設定は自分で作成したViewにそれぞれ設定をします.

この時にShowViewとHideViewを設定しておきます(これがないと表示切替のときに表示されないみたいです)

ほかのView(GameView・EndView)も同様に設定を行います.

f:id:ayousanz:20201117165919p:plain

それぞれのViewを設定した後にView同士をNodeでつないでいきます.

Viewの切り替えは画面タッチを以下(Input.cs(仮))のように取得していましたが,グラフ上でも切り替わってほしいため,GameEventMessage.SendEvent("toGameView"); を使用してイベントで知らせます. 詳しい内容は以下のサイトを参考にしています.

3dcg-school.pro

Input.cs(仮)

        if (Input.touchCount > 0)
        {
            Touch touch = Input.GetTouch(0);
            if (touch.phase == TouchPhase.Began)
            {
                if (gameState == GameState.Title)
                {
                    TitleViewHandler();
                }else if (gameState == GameState.End)
                {
                    EndViewHandler();
                }
            }
        }

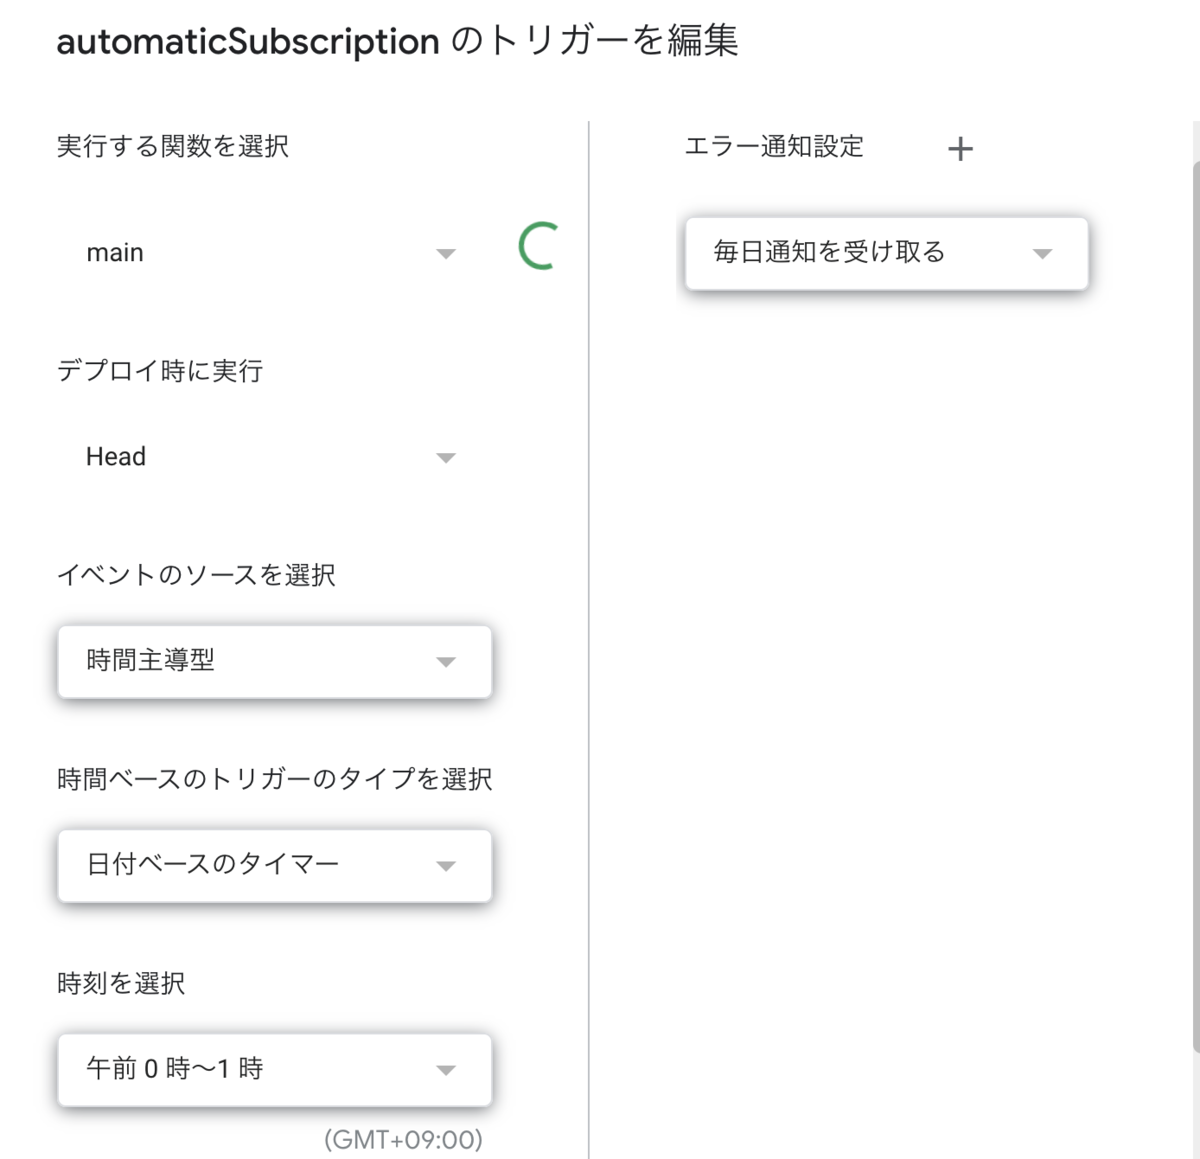
GameEventMessage.SendEvent 設定後 画面の切り替えを確認すると以下のようになります.

f:id:ayousanz:20201117173253g:plain

使用したアセット

assetstore.unity.com

assetstore.unity.com

assetstore.unity.com

assetstore.unity.com

assetstore.unity.com

github.com

assetstore.unity.com

Unity ML-Agents 複数環境実行でのCPUのコア数とスレッド数の違いにおける処理速度

ちょっと調べてみたのですが,結局わからなかったので自分で測ってみました 結果は,私の環境ですので他のところだと違う結果になる可能性は高いと思われます.

結論

今回はコア数に依存しました

環境

  • Ryzen 7 2700X Eight-Core Processor ( 8core/16thread)
  • memory 64GB
  • Unity2019.4.12f1
  • ML-Agent 1.0.5
  • Anaconda 4.8.5
  • Python 3.7.9
  • tensorflow 2.3.1

測定するゲーム

以下の画像のもので測定を行いました f:id:ayousanz:20201011202326p:plain

スタート位置・ゴール位置は固定です

Agent 設定

f:id:ayousanz:20201011202442p:plain

ハイパーパラメータ設定

behaviors:
  YousanSideGame:
    trainer_type: ppo
    hyperparameters:
      batch_size: 2048
      buffer_size: 10240
      learning_rate: 3.0e-2
      beta: 0.005
      epsilon: 0.2
      lambd: 0.95
      num_epoch: 3
      learning_rate_schedule: linear
    network_settings:
      normalize: true
      hidden_units: 64
      num_layers: 2
    reward_signals:
      extrinsic:
        gamma: 0.99
        strength: 1.0
    keep_checkpoints: 5
    checkpoint_interval: 500000
    max_steps: 200000
    time_horizon: 512
    summary_freq: 10000
    threaded: true

agentのscript

PlayerController.cs

using UniRx;
using UniRx.Triggers;
using UnityEngine;

public class PlayerController : MonoBehaviour
{
    [SerializeField] private float speed = 0.3f;
    
    private Rigidbody2D _rigidbody2D;
    [SerializeField] private float jumpSpeed = 300.0f;
    [SerializeField] private bool isJump = true;
    [SerializeField] private GameObject startPoint;

    // Start is called before the first frame update
    void Start()
    {
        _rigidbody2D = GetComponent<Rigidbody2D>();
        // this.UpdateAsObservable().Subscribe(_ =>
        // {
        //     
        //     float horizontalInput = Input.GetAxis("Horizontal");
        //     float verticalInput = Input.GetAxis("Vertical");
        //     
        //     if (horizontalInput > 0)
        //     {
        //         RightMove(horizontalInput,verticalInput);
        //     }else if (horizontalInput < 0)
        //     {
        //         LeftMove(horizontalInput,verticalInput);
        //     }
        // });
        //
        // this.UpdateAsObservable().Where(_ => Input.GetKey(KeyCode.Space) && isJump).Subscribe(_ =>
        // {
        //     Jump();
        // });
        this.UpdateAsObservable().Where(_ => Input.GetKeyDown(KeyCode.R)).Subscribe(_ =>
        {
            Reset();
        });
    }

    public void RightMove(float hInput)
    {
        // Debug.Log("right move");
        transform.localScale = new Vector3(1,1,1);
        Vector2 input = new Vector2(hInput,0f);
        _rigidbody2D.velocity = input.normalized * speed;
    }

    public void LeftMove(float hInput)
    {
        // Debug.Log("left move");
        transform.localScale = new Vector3(-1,1,1);
        Vector2 input = new Vector2(hInput,0f);
        _rigidbody2D.velocity = input.normalized * speed;
    }

    public void Jump()
    {
        _rigidbody2D.velocity = Vector2.up*jumpSpeed;
        isJump = false;
    }
    

    private void OnCollisionEnter2D(Collision2D other)
    {
        if (other.gameObject.CompareTag("Ground"))
        {
            isJump = true;
        }
    }
    public void Reset()
    {
        transform.localPosition = startPoint.transform.localPosition;
        _rigidbody2D.velocity = Vector2.zero;
        _rigidbody2D.AddForce(Vector2.zero);
    }

    public bool GetIsJump()
    {
        return isJump;
    }
    
    
}

PlayerAgent

using Unity.MLAgents;
using Unity.MLAgents.Sensors;
using UnityEngine;

public class PlayerAgent : Agent
{
    public PlayerController playerController;
    private Rigidbody2D _rigidbody2D;
    public Transform endPoint;

    public override void Initialize()
    {
        _rigidbody2D = GetComponent<Rigidbody2D>();
    }

    public override void OnEpisodeBegin()
    {
        playerController.Reset();
    }

    public override void CollectObservations(VectorSensor sensor)
    {
        // gold position : 2point
        sensor.AddObservation(endPoint.transform.localPosition.x);
        sensor.AddObservation(endPoint.transform.localPosition.y);
        
        // Agent position : 2point
        sensor.AddObservation(transform.localPosition.x);
        sensor.AddObservation(transform.localPosition.y);
        
        // Agent velocity :2point
        sensor.AddObservation(_rigidbody2D.velocity.x); 
        sensor.AddObservation(_rigidbody2D.velocity.y);
        
    }

    public override void OnActionReceived(float[] vectorAction)
    {
        AddReward(-0.0001f);
        float h = vectorAction[0];
        // if(vectorAction[1] == 1f && playerController.GetIsJump()) playerController.Jump();
        if(0f < h) playerController.RightMove(h);
        else if(h < 0f) playerController.LeftMove(h);
        
    }

    public override void Heuristic(float[] actionsOut)
    {
        actionsOut[0] = Input.GetAxis("Horizontal");
        // actionsOut[1] = Input.GetKey(KeyCode.Space) ? 1.0f : 0.0f;
    }
    
    private void OnTriggerEnter2D(Collider2D other)
    {
        if (other.gameObject.CompareTag("EndPoint"))
        {
            Debug.Log("is goal");
            SetReward(1.0f);
            EndEpisode();
        }else if (other.gameObject.CompareTag("Finish"))
        {
            Debug.Log("is game over");
           SetReward(0.0f);
           EndEpisode();
        }
    }


}

結果

step数:190000での比較です(一回目のスクショがミスっていたため,200000が映ってなかったです..)

  • 4 env : Time Elapsed 240.355s
  • 8 env : Time Elapsed 217.626s
  • 16 env : Time Elapsed 222.897s
  • 32 env : Time Elapsed 215.245s

ログスクショ

以下,それぞれの実行環境数の結果スクショです

f:id:ayousanz:20201011203201j:plain
実行環境数:4
f:id:ayousanz:20201011203213j:plain
実行環境数:8
f:id:ayousanz:20201011203303j:plain
実行環境数:16
f:id:ayousanz:20201011203318j:plain
実行環境数:32

TensorBoardスクショ

Cumulative Reward

f:id:ayousanz:20201011203814p:plain

Episode Length

f:id:ayousanz:20201011203841p:plain

Policy

f:id:ayousanz:20201011203905p:plain

Unity ML Agentの基本の改変サンプル

Unity ML agentを学習するうえでUnity ml-agentのサンプルを改変したのでまとめました

対象者

  • Unity ml-agentsの内容を確認して,自作ゲームなどに取り入れていきたい方
  • Unityの基本はわかっている方

環境

  • Unity 2019.4.12f1
  • ML-Agents 1.0.5
  • Anaconda 4.8.5
  • Python 3.7.9

環境構築は,省きます

やったこと

Unityさんのこちらのドキュメントを少しづついじっています f:id:ayousanz:20201009210642p:plain

以下のものはこちらで公開しています

github.com

3つのターゲットから得点の高いターゲットだけを取得する

詳細

set-up

3つのターゲットから一番報酬の高い赤に向かうものです. それぞれのターゲットに異なる報酬を設定しています.

報酬設定

  • 赤:+1.0
  • 青:+0.7
  • 緑:+0.5f

Observation space

  • ターゲットのposition: 3*3 = 9
  • 自分自身のposition 3
  • 自分の速度 (x,y) 2 合計 14

Action space

  • 上下,左右の2つ

デモ

f:id:ayousanz:20201009163931g:plain

コード

using UnityEngine;
using Unity.MLAgents;
using Unity.MLAgents.Sensors;

public class RollerAgent : Agent
{
    Rigidbody _rBody;
    public Transform targetRed;
    public Transform targetBlue;
    public Transform targetGreen;
    void Start()
    {
        _rBody = GetComponent<Rigidbody>();
    }

    public override void OnEpisodeBegin()
    {
        if (this.transform.localPosition.y < 0)
        {
            // If the Agent fell, zero its momentum
            this._rBody.angularVelocity = Vector3.zero;
            this._rBody.velocity = Vector3.zero;
            this.transform.localPosition = new Vector3(0, 0.5f, 0);
        }

        // Move the target to a new spot
        targetRed.localPosition = new Vector3(Random.value * 8 - 4,
                                           0.5f,
                                           Random.value * 8 - 4);
        targetBlue.localPosition = new Vector3(Random.value * 8 - 4,
            0.5f,
            Random.value * 8 - 4);
        targetGreen.localPosition = new Vector3(Random.value * 8 - 4,
            0.5f,
            Random.value * 8 - 4);
    }

    public override void CollectObservations(VectorSensor sensor)
    {
        // Target and Agent positions
        sensor.AddObservation(targetRed.localPosition);
        sensor.AddObservation(targetGreen.localPosition);
        sensor.AddObservation(targetBlue.localPosition);
        sensor.AddObservation(this.transform.localPosition);

        // Agent velocity
        sensor.AddObservation(_rBody.velocity.x);
        sensor.AddObservation(_rBody.velocity.z);
    }

    public float speed = 10;
    public override void OnActionReceived(float[] vectorAction)
    {
        // Actions, size = 2
        Vector3 controlSignal = Vector3.zero;
        controlSignal.x = vectorAction[0];
        controlSignal.z = vectorAction[1];
        _rBody.AddForce(controlSignal * speed);

        // Rewards
        float distanceToTargetRed = Vector3.Distance(this.transform.localPosition, targetRed.localPosition);
        float distanceToTargetBlue = Vector3.Distance(this.transform.localPosition, targetBlue.localPosition);
        float distanceToTargetGreen = Vector3.Distance(this.transform.localPosition, targetGreen.localPosition);

        // Reached target
        if (distanceToTargetRed < 1.42f)
        {
            SetReward(1.0f);
            EndEpisode();
        }
        if (distanceToTargetBlue < 1.42f)
        {
            SetReward(0.7f);
            EndEpisode();
        }
        if (distanceToTargetGreen < 1.42f)
        {
            SetReward(0.5f);
            EndEpisode();
        }

        // Fell off platform
        if (this.transform.localPosition.y < 0)
        {
            EndEpisode();
        }
    }

    public override void Heuristic(float[] actionsOut)
    {
        actionsOut[0] = Input.GetAxis("Horizontal");
        actionsOut[1] = Input.GetAxis("Vertical");
    }
}

一つ下の床にあるターゲットに向かう

詳細

set-up

床が二つあり,より下位にある床のターゲットを取得する

報酬設定

  • 青:+1.0

Observation space

  • ターゲットのposition: 3
  • 自分自身のposition 3
  • 自分の速度 (x,y) 2 合計 8

Action space

  • 上下,左右の2つ

デモ

f:id:ayousanz:20201009201159g:plain

コード

using UnityEngine;
using Unity.MLAgents;
using Unity.MLAgents.Sensors;

public class DownBall : Agent
{
    Rigidbody _rBody;
    public Transform target;
    void Start()
    {
        _rBody = GetComponent<Rigidbody>();
    }

    public override void OnEpisodeBegin()
    {
        if (this.transform.localPosition.y < 0)
        {
            // If the Agent fell, zero its momentum
            this._rBody.angularVelocity = Vector3.zero;
            this._rBody.velocity = Vector3.zero;
            this.transform.localPosition = new Vector3(0, 0.5f, 0);
        }

        // Move the target to a new spot
        target.localPosition = new Vector3(Random.value * 8 - 12,
                                           -3.5f,
                                           Random.value * 8 -4);
    }

    public override void CollectObservations(VectorSensor sensor)
    {
        // Target and Agent positions
        sensor.AddObservation(target.localPosition);
        sensor.AddObservation(this.transform.localPosition);

        // Agent velocity
        sensor.AddObservation(_rBody.velocity.x);
        sensor.AddObservation(_rBody.velocity.z);
    }

    public float speed = 10;
    public override void OnActionReceived(float[] vectorAction)
    {
        // Actions, size = 2
        Vector3 controlSignal = Vector3.zero;
        controlSignal.x = vectorAction[0];
        controlSignal.z = vectorAction[1];
        _rBody.AddForce(controlSignal * speed);

        // Rewards
        float distanceToTarget = Vector3.Distance(this.transform.localPosition, target.localPosition);

        // Reached target
        if (distanceToTarget < 1.42f)
        {
            SetReward(1.0f);
            EndEpisode();
        }

        // Fell off platform
        if (this.transform.localPosition.y < -4f)
        {
            EndEpisode();
        }
    }

    public override void Heuristic(float[] actionsOut)
    {
        actionsOut[0] = Input.GetAxis("Horizontal");
        actionsOut[1] = Input.GetAxis("Vertical");
    }
}

2つのターゲットを取得する

詳細

set-up

2つのターゲットがそれぞれ高さの違う床に設置されている. 緑のターゲットはランダムで設置される (両方とるように設定)

報酬設定

  • 紫:+1.0
  • 緑:+0.7

Observation space

  • ターゲットのposition: 3*2 = 6
  • 自分自身のposition 3
  • 自分の速度 (x,y) 2 合計 12

Action space

  • 上下,左右の2つ

デモ

f:id:ayousanz:20201009205411g:plain

コード

using System;
using UnityEngine;
using Unity.MLAgents;
using Unity.MLAgents.Sensors;
using Random = UnityEngine.Random;

public class TwoTarget : Agent
{
    Rigidbody _rBody;
    public Transform targetGreen;
    public Transform goal;
    void Start()
    {
        _rBody = GetComponent<Rigidbody>();
    }

    public override void OnEpisodeBegin()
    {
        if (this.transform.localPosition.y < 0)
        {
            // If the Agent fell, zero its momentum
            this._rBody.angularVelocity = Vector3.zero;
            this._rBody.velocity = Vector3.zero;
            this.transform.localPosition = new Vector3(0, 0.5f, 0);
        }
        RecreateTarget();
        ActiveTarget();
    }

    public override void CollectObservations(VectorSensor sensor)
    {
        // Target and Agent positions
        sensor.AddObservation(targetGreen.localPosition);
        sensor.AddObservation(goal.localPosition);
        sensor.AddObservation(this.transform.localPosition);

        // Agent velocity
        sensor.AddObservation(_rBody.velocity.x);
        sensor.AddObservation(_rBody.velocity.z);
    }

    public float speed = 10;
    public override void OnActionReceived(float[] vectorAction)
    {
        // Actions, size = 2
        Vector3 controlSignal = Vector3.zero;
        controlSignal.x = vectorAction[0];
        controlSignal.z = vectorAction[1];
        _rBody.AddForce(controlSignal * speed);

        // Fell off platform
        if (this.transform.localPosition.y < -4f)
        {
            EndEpisode();
        }
    }

    private void OnCollisionEnter(Collision other)
    {
        if (other.gameObject.CompareTag("Target/Green"))
        {
            AddReward(0.7f);
            other.gameObject.SetActive(false);
        }

        if (other.gameObject.CompareTag("Goal"))
        {
            AddReward(1.0f);
            EndEpisode();
        }
    }

    public override void Heuristic(float[] actionsOut)
    {
        actionsOut[0] = Input.GetAxis("Horizontal");
        actionsOut[1] = Input.GetAxis("Vertical");
    }

    void RecreateTarget()
    {
        // Move the target to a new spot
        targetGreen.localPosition = new Vector3(Random.value * 8 - 4-7,
            -1.5f,
            Random.value * 8 - 4-7);
    }

    void ActiveTarget()
    {
        targetGreen.gameObject.SetActive(true);
    }
}

Unity ML-Agents まとめ

公式サイトなどをみてもなかなか難しいものがあったのでいろいろとまとめてみます あとから別記事に分けると思いますが,いまのところこのままで... (見にくいと思いますが,許して:: (更新予定)

対象者

いまからML-Agentsをやってみたいという方~サンプルやったから,もうちょっと詳しく知りたい

環境

現在 2020/10/8

環境構築方法

ドキュメントにあるように Unity 2018.4以上 Pythonを3.6.1以上で構築する (Anacondaで作ったほうが楽?)

Install Unity 2018.4 or Later

Install Python 3.6.1 or Higher

github.com

環境構築でerrorがおきる

2020/11/19現在(Unity2019.4.14,Release_9の情報)

fails to pass a sanity check due to a bug in the windows runtime. See this issue for more information:

みたいなエラーが起きた場合は,Stack Overflowに解決策があったのでそれをやってみる

pip install numpy==1.19.3

はじめにしたほうがいいこと

Unity さんの公式ドキュメントとサンプルを確認する

github.com

はじめのサンプルの改変をしてみたので確認

こちらは私がCubeを追うものを改変したものになります. 以下のようなものが数点入っています. f:id:ayousanz:20201009163931g:plain

公式サンプルを詳しく説明しているサイト

enjoy-unity.net

ayousanz.hatenadiary.jp

Python側の実行時のコマンドライン引数

note.com

ログの見方

f:id:ayousanz:20201008231748p:plain こちらのサイトからほぼ引用

am1tanaka.hatenablog.com

  • Mean Reward:報酬の平均 訓練をするごとに高くなっていきどこかの値に収束する
  • Std of Reward: リワードの標準偏差 はじめはばらつきがあった0に近づくとよい?

訓練の高速化

note.com

ドラゴンクエスト1の名前の入力画面を作成する【Unity】

RPGの原点ともいわれるドラゴンクエストを作ってみたいと思い入力画面を作ってみました

デモ

f:id:ayousanz:20201006062740g:plain

実装内容

  • 矢印キーでの文字を指し示す矢印の移動
  • Zキーを押すことで,文字の入力(名前の書き換え)
  • 「もどる」での文字の削除

実装方法

先に書いておきますが,この方法は最適の実装ではありません(今後修正予定) 特に矢印の移動の部分においては処理が重くなることが分かっています

文字と矢印の準備

本来は文字もscriptから描写,矢印は一つだけ使用して動かすという方向性で考えていたのですがうまくいかなかったために以下の方法で実装しています

すべての文字に対して,Textとその子供に矢印を設置しました f:id:ayousanz:20201006063240p:plain

矢印の見掛け上の移動

テキストのcolor のalpha値を0と255を切り替えることで,任意の文字に矢印が動いているように見せています

f:id:ayousanz:20201006063401p:plain

private void ChangeArrowAlpha(int _row, int _column, bool isView)
    {
        valueListList[_row].GetObject(_column).GetComponent<Transform>().GetChild(0).GetComponent<Text>().color = isView ? new Color(255f,255f,255f,255f) : new Color(255f,255f,255f,0f);
    }

文字の書き換え方法

Zキーを任意の文字の上で押したときに名前にその文字に書き換える方法は以下で実装しています

private static string ChangeCharAt(string tStr, int index, string newStr)
    {
        return tStr.Remove(index, 1).Insert(index,newStr);
    }

InsertとRemoveの詳しい説明は公式をご覧ください

docs.microsoft.com

docs.microsoft.com

空白の文字を飛ばして,矢印の移動をする

空白であるかどうかを確認し,その後空白の場合は移動する配列に+,-を追加して調節しています

private bool IsEmptyString(int row,int column)
    {
        // TODO:進む先の文字が空白かどうかを判断する
        var temp = valueListList[row].GetValue(column);
        return temp.Trim().Length == 0 || string.IsNullOrEmpty(temp);
    }

文字の管理について

上記の文字は独自のクラスを用いてリスト化しています. 画像はOdinを導入しているためリストの見た目はデフォルトと異なります

f:id:ayousanz:20201006064144p:plain

また,独自リストは以下

//Inspectorに複数データを表示するためのクラス
[System.SerializableAttribute]
public class ValueList{
    public List<GameObject>  list = new List<GameObject>();

    public ValueList(List<GameObject>  list){
        this.list = list;
    }

    public GameObject GetObject(int index)
    {
        return list[index];
    }

    public int GetLength()
    {
        return list.Count;
    }

    public void Clear()
    {
        list.Clear();
    }

    public void PrintInList()
    {
        
        StringBuilder str = new StringBuilder();
        for (int index = 0; index < list.Count; index++)
        {
            string text = list[index].GetComponent<Text>().text.ToString();
            str.Append(text);
        }
        Debug.Log(str.ToString());
    }

    public string GetValue(int index)
    {
        return list[index].GetComponent<Text>().text;
    }
}

ayousanz.hatenadiary.jp

多次元ListをInspectorに表示するclassの拡張

多次元クラスを使うときってないですか?? ちょっと使うところがあったので,以下のサイトを参考にちょっと拡張してみました

kan-kikuchi.hatenablog.com

拡張した機能

  • 指定したindexの値の取得
  • リストの削除(中身の削除)
  • リストの長さの取得

Inspector上での見た目

Odinが入っているため,デフォルトと少し違います f:id:ayousanz:20201004205706p:plain

class Code

//Inspectorに複数データを表示するためのクラス
[System.SerializableAttribute]
public class ValueList{
    public List<string>  list = new List<string>();
    
    public string GetValue(int index)
    {
        return list[index];
    }

    public ValueList(List<string>  list){
        this.list = list;
    }

    public int GetLength()
    {
        return list.Count;
    }

    public void Clear()
    {
        list.Clear();
    }
}

GoogleSpreadSheetから定期予定をtrelloに追加する【GoogleAppsScript】【TrelloAPI】

IFTTTが有料になったことで,月単位や週単位での予定をIFTTTで管理,追加していたものが数の制限で厳しなくなりました

そこで,SpreadSheetに予定の詳細や追加予定日,周期などの書き,GASで自動追加してくれるようにしてみました!

完成画像

カード追加後は締め切りと次回登録日は周期に基づいて,変更されます

スプレットシートでの管理画面画像

trelloのカード

実装機能

  • カードの名前,締め切り,追加するリストの指定
  • 周期より次回登録日を追加後に自動更新
  • 周期のプルダウン選択
  • (注) 周期は現在のところ[毎日,2日,週,月,年]での固定になります

準備

Google Sheet

  1. プルダウンや項目の順番がスクリプトに関係してくるため,こちらからテンプレートをダウンロードしてご使用ください

  2. trelloのkey,tokenの設定をします プルダウンは現在のところ,自分で設定する必要があります. リスト名の列を右クリックし,データの入力規則から「リストを直接指定」で自身のリスト名を追加してください

GoogleAppsScript

Script fileの作成

Goole Driveの中に適当な名前でScriptを作成します (以下のコードをスクリプトに貼り付けます,ファイル名は適当で大丈夫です)

Main.gs

function main() {
  let registrationList = getCanRegistrationItems();
  for(let index=0;index<registrationList.length;index++){
    addCardToTrello(registrationList[index]);
    changeGSheetNextRegistrationDate(registrationList[index]["infoLine"]);
  }
}

//登録する情報をGSheetからfilter->return
function getCanRegistrationItems(){
  let registraionData = [];
  let sheet = SpreadsheetApp.openById(spreadSheetId).getActiveSheet();
  for(let index = 2;index<=sheet.getLastRow();index++){
    let range = sheet.getRange(index,1,1,5).getValues();
    if(isCanRegistration(range[0][4])){
      registraionData.push({
        taskName:range[0][0],
        listName:range[0][2],
        deadline:range[0][3],
        infoLine:index //google sheetのどの行にあったのかを保持
      });
    }
   }
  return registraionData;
}

//google sheetの次回登録日及び締め切りを変更する
function changeGSheetNextRegistrationDate(infoLine){
  let sheet = SpreadsheetApp.openById(spreadSheetId).getActiveSheet();
//  締め切りと次回登録日の取得 = [締め切り,次回登録日]
  let valueTemp = sheet.getRange(infoLine, 2,1,4).getValues();
  let period = valueTemp[0][0];
  console.log("追加周期:"+period);
//  現在の日付を取得
  console.log(valueTemp[0]);
  let beforeRegistrationDate = Moment.moment(valueTemp[0][2]); 
  let beforeDeadlineDate = Moment.moment(valueTemp[0][3]);
  let temp1 = "";
  let temp2 = "";
//  周期の応じて日付を更新後,GSheetの値の更新
  if(period == "毎日"){
    temp1 = beforeRegistrationDate.add(1,'days');
    temp2 = beforeDeadlineDate.add(1,'days');
  }else if(period == "2日"){
    temp1 = beforeRegistrationDate.add(2,'days');
    temp2 = beforeDeadlineDate.add(2,'days');
  }else if(period == "週"){
    temp1 = beforeRegistrationDate.add(1,'weeks');
    temp2 = beforeDeadlineDate.add(1,'weeks');
  }else if(period == "月"){
    temp1 = beforeRegistrationDate.add(1,'months');
    temp2 = beforeDeadlineDate.add(1,'months');
  }else if(period == "年"){
    temp1 = beforeRegistrationDate.add(1,'years');
    temp2 = beforeDeadlineDate.add(1,'years');
  }
  
  console.log("日付の変更")
  let temp1F = temp1.format("YYYY-MM-DD");
  let temp2F = temp2.format("YYYY-MM-DD");
  console.log(temp1F);
  console.log(temp2F);
  let setValues = [[temp1F,temp2F]];
  let nextRegistrationDate = sheet.getRange(infoLine,4,1,2).setValues(setValues);
}

//日付が現在時刻よりも古い場合trueを返す
function isCanRegistration(date){
  let today = new Date();
  let diffDate = new Date(date);
  return Moment.moment(diffDate).isBefore(today);
}

TrelloAPI.gs

const idList = getTrelloListId();

function addCardToTrello(cardInfo){
  let cardName = cardInfo['taskName'];
  let listId = isListId(cardInfo['listName']);
  let dueDate = new Date(cardInfo['deadline']);
  const options =
   {
     "method" : "post",
   };
  let urlCard ="https://trello.com/1/cards?key="+key+"&token="+token+"&idList="+listId+"&name="+cardName+"&due="+dueDate;
  let responseCard = UrlFetchApp.fetch(urlCard,options);
  console.log(cardName+"を"+listId+"のリストに期限を"+dueDate+"として登録しました");
}

function isListId(listName){
  for(let index = 0;index<idList.length;index++){
    if(idList[index]['name'] == listName) {
      return idList[index]['id'];
    }
  }
}

function getTrelloListId(){
  let urlList =  "https://trello.com/1/boards/"+privateBoardId+"/lists?key="+key+"&token="+token+"&fields=name";
  let json = JSON.parse(UrlFetchApp.fetch(urlList).getContentText())
  return json;
}

config.gs

key = "your key";
token = "your token";
privateBoardId = 'your board id';
spreadSheetId = 'spread sheee id'

GASにMoment.jsを追加します

スクリプトエディタから「リソース」→「ライブラリ」から MHMchiX6c1bwSqGM1PZiW_PxhMjh3Sh48 を入れてライブラリを追加してください Versionは最新のもので大丈夫です

(2021-3-15 追記) 2021-3-15現在 Moment.jsのライブラリIDが 15hgNOjKHUG4UtyZl9clqBbl23sDvWMS8pfDJOyIapZk5RBqwL3i-rlCo になっているそうです.

GASを定期実行できるようにする

以下のボタンを教えて定期実行の設定をする

設定画面は以下の通り

時刻の設定は任意の時間で大丈夫です

使用方法

ここまで来れば,spreadsheetの方で追加するカードの名前,日付などを追加してください 日付はダブルクリックすることで,カレンダー記入することができます 一番上と同じ画像ですが..

参考文献

沢山あるので,覚えている範囲で.... qiita.com

tonari-it.com